


Mastering Bowl Turning: A Guide to Gouges and Grinds
If you’re new to the world of bowl turning, the wide array of available tools, particularly bowl gouges, can feel a little intimidating. This guide will help you understand the different types of bowl gouges, their unique grinds, and how to sharpen them for optimal performance.
What Makes a Bowl Gouge Unique?
While a bowl gouge might look similar to a spindle gouge, a few key differences set them apart. The most significant is the flute, the U-shaped groove that runs the length of the tool. Bowl gouges have a much deeper and slightly narrower flute. This design allows for more efficient chip removal, enabling you to clear material faster.
Another major distinction is the bevel angle on the nose of the tool. Bowl gouges typically have a steeper bevel, ranging from 50 to 60 degrees, while spindle gouges are shallower, at 35 to 45 degrees. Additionally, bowl gouges are generally longer and have a larger diameter steel bar stock, providing more mass and durability for heavier cuts.
Types of Bowl Gouges and Their Uses
Bowl gouges can be broken down into four main categories, each with a specific purpose.
1. Roughing Gouges (Fingernail Grind)
This is your workhorse tool for removing bulk material and getting the initial rough shape of your bowl. These bowl gouges are typically larger in size, from 1/2” to 3/4”. The “fingernail” grind has a slightly rounded, curved profile on the nose and wings. The bevel angle is usually between 50 and 55 degrees.
There are two primary ways to use a roughing gouge on the exterior of a bowl:
-
Scraping Peel Cut: This cut is great for removing a lot of material quickly. It involves a very low handle position with the flute at about the 10 o’clock position. The cut is made primarily on the wing of the gouge, which can leave a rougher surface but excels at initial shaping.
- Bevel Riding Push Cut: This method provides a cleaner surface finish. It involves riding the nose bevel of the gouge. To execute this cut, you begin with the handle far away from your body and the flute at the 9:30 to 10 o’clock position, then swing the handle around as you move along the curve. This creates a much smoother surface, reducing the need for extensive sanding later on.
2. Irish Grind Gouges
Similar to the roughing gouge, the Irish grind bowl gouge is distinguished by its longer wings. This extended wing allows for a technique called shear scraping. By rolling the tool over and using the long wing to scrape the surface, you can achieve an incredibly fine, clean surface finish. This is especially useful for refining curves and minimizing tear-out.
3. Refining Gouges
Once you have your rough shape, you’ll want to switch to a smaller, more precise tool. Refining gouges are generally smaller, often with a 1/4” or 3/8” bar stock. Their smaller size allows for more delicate, controlled cuts, which are crucial when you’re getting close to your final shape and wall thickness. These gouges apply less pressure on the wood, minimizing the risk of tear-out and leaving a cleaner finish. When making these final cuts, you can also increase your lathe speed by about 20% to achieve an even cleaner surface.
4. Bottoming Gouges
As the name suggests, this gouge is used to finish the bottom of the bowl’s interior. With a steeper 60-degree bevel angle and a flatter profile on the nose, it allows you to get into the tight, steep radius at the bottom of a bowl without the handle hitting the rim. This steep nose allows the cutting edge to be further away from the bowl’s rim, making it the perfect tool for finishing the bowl’s interior floor.
When using a bottoming gouge, you must start the cut on the existing bevel within the bowl rather than at the rim, as the square nose can “skate” or slip if you try to start from the edge.
Understanding Gouge Measurements
When buying a new gouge, it’s important to know that American and European manufacturers measure them differently.
-
American Measurement: The size of the gouge is determined by the diameter of the bar stock (the steel bar itself). So, a 1/2” gouge has a 1/2” diameter bar.
- European Measurement: The size is determined by the width of the flute. To find the bar stock diameter, you typically add 1/8” to the flute width. For example, a 3/8” European-measured gouge will have a 1/2” diameter bar stock.
Always check the product description when ordering to ensure you get the correct size.
Steel Types: M2 vs. Premium Steels
The material your gouge is made from directly impacts its performance and how long it holds an edge.
-
M2 High-Speed Steel (HSS): This is the industry standard for bowl gouges. It offers a significant improvement in wear resistance over older high-carbon steel. If you’re starting out, an M2 gouge is a great place to begin.
- Premium Steels: Modern advancements have introduced steels like M42, cryo-treated, and powder metallurgy tools. These premium steels have superior wear resistance, meaning you’ll spend more time turning and less time sharpening. While they cost more, they offer greater performance and a longer-lasting edge.
How to Sharpen Your Gouges
Proper sharpening is crucial for effective and safe turning. Using a sharpening jig, like the Easy Grind, Oneway Vari-Grind, or Oneway Wolverine sharpening systems, ensures a consistent and repeatable bevel angle.
Safety First: When grinding, keep your support hand low on the V-arm to prevent injury if the tool slips off the wheel.
Sharpening a Traditional Gouge (Fingernail Grind)
-
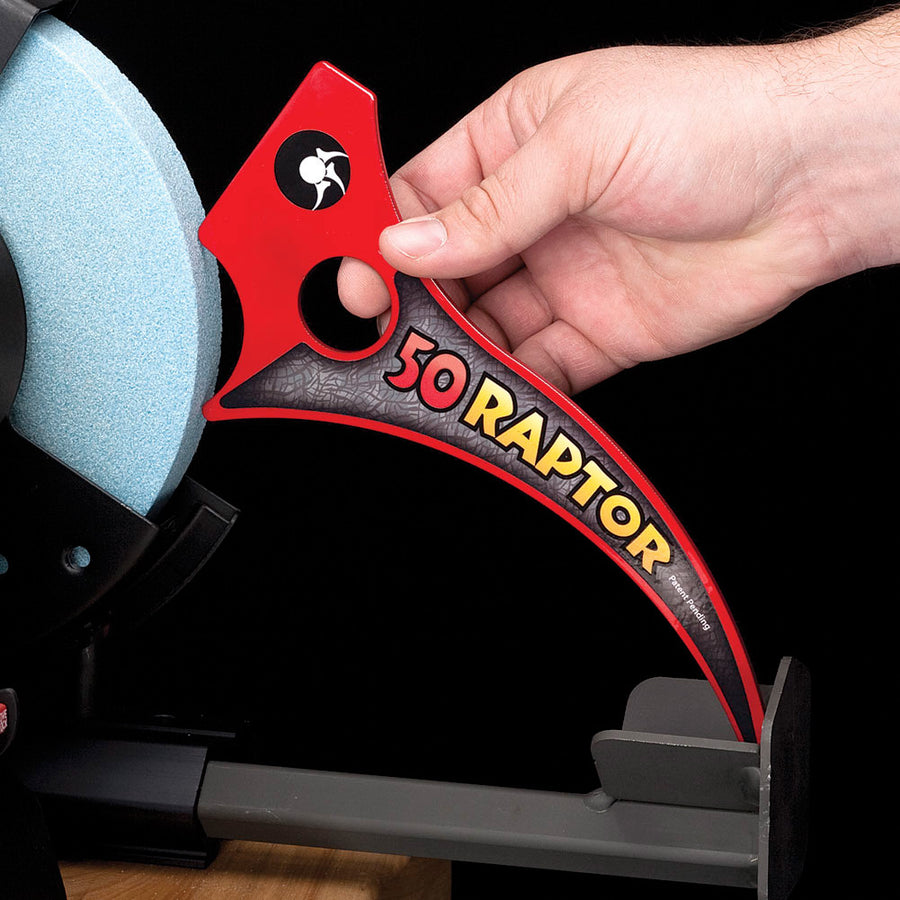
Set the V-Arm and Protrusion: Use a 50-degree raptor (or similar tool) to set your V-arm angle. Then, set your tool protrusion to 2” in the jig.
-
Grind the Wings: Start by grinding the wings of the tool, rocking the jig back and forth until the steel is clean. Use a two-handed grip for stability.
- Blend the Nose: Once the wings are sharpened, make a quick, sweeping pass across the nose of the tool to blend the wings and sharpen the very tip. Avoid over-grinding the nose, as this can create a “scoop” that negatively affects the tool’s performance.
Sharpening an Irish Grind
The process is similar to a traditional grind, but because of the longer wings, you’ll need to rotate the jig further over to engage the entire wing on the grinding wheel. The same process applies: grind the wings first, then blend the nose with a quick pass.
Sharpening a Bottoming Gouge
Bottoming gouges typically have a steeper, 60-degree bevel.
-
With a Jig: Set your V-arm to 60 degrees. As with other gouges, sharpen the wings first, then make a quick pass on the nose.
- With a Platform: Some turners prefer to use a platform for a square-across bottoming gouge. Set the platform angle to 60 degrees and, keeping the tool perfectly square to the wheel, sharpen the wings and then the nose.
By understanding the purpose of each gouge, the nuances of different grinds, and the proper sharpening techniques, you’ll be well on your way to mastering the art of bowl turning.

With these gouges in your toolbox and a solid understanding of their uses and sharpening techniques, you’ll be well on your way to turning beautiful and refined bowls.
Featured posts